MetaMask can support USDt across multiple networks, such as Ethereum, BNB Chain, and Polygon, allowing users to manage stablecoins effectively.
Installing MetaMask only from official sources and keeping the seed phrase secure are essential first steps for security.
Transferring USDt requires the correct wallet address, network selection, and sufficient gas fees to complete transactions.
Users can resolve common issues like tokens not showing up or failed transactions by manually importing tokens and verifying network connections.
USDt (Tether) is a stablecoin pegged to the US dollar, which means that it aims to remain stable, closely matching the value of one US dollar. It achieves this by maintaining reserves of assets like cash, cash equivalents, and other traditional financial instruments that back its value.
This mechanism ensures that each USDt token in circulation is supported by an equivalent amount of assets, providing stability and trust for users.
This makes USDt a suitable option for holding and transferring funds, offering more certainty in navigating cryptocurrency market fluctuations.
Users can seamlessly store and use stablecoins by combining USDt’s stability with MetaMask’s features. Adding USDt to a MetaMask wallet is straightforward but requires specific steps to ensure everything works correctly.
This guide explains how to add USDt to MetaMask. It covers what MetaMask is, the prerequisites for adding USDt, steps for setting it up, troubleshooting common issues, and tips for safe usage.
MetaMask is a digital cryptocurrency wallet that lets users store, send, and receive tokens while maintaining complete control of their funds through private keys.
It integrates seamlessly with decentralized finance (DeFi) platforms, allowing access to services like lending, borrowing, and trading across multiple blockchain networks.
This versatility makes MetaMask an ideal tool for managing USDt across ecosystems. Its user-friendly design, strong security features, and compatibility with decentralized applications (dApps) make it a reliable choice for users of all experience levels.
Prerequisites Before Adding USDt to MetaMask
Adding USDt to MetaMask requires knowledge of supported networks and proper setup, as explained in this section.
Understand Network Support for USDt
MetaMask natively supports Ethereum and can be configured to work with other Ethereum Virtual Machine (EVM)-compatible networks like BNB Chain and Polygon. Each offers unique benefits:
Ethereum: Works with most wallets and exchanges but can involve higher fees. Token standard: ERC-20.
BNB Chain: This can offer faster transactions and lower fees, making it a more affordable option. Token standard: BEP-20.
Polygon: This one can reduce costs and support high-frequency transactions with a focus on scalability. Token standard: POL.
When using USDt with MetaMask, selecting a network that aligns with the user’s transaction requirements, cost considerations, and d’Apps compatibility is crucial.
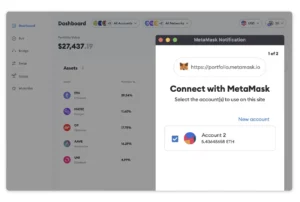
Step 1: Install and Set Up MetaMask
Users must download MetaMask as a browser extension or mobile app from official sources to prevent security risks. After installation, users create a wallet by setting a strong password and securely storing the seed phrase.
Download MetaMask
Install MetaMask: It can be set up as a browser extension for Chrome, Firefox, Brave, or Edge or as a mobile app for iOS and Android. To avoid phishing scams, only download from official sources.
Create a wallet: Open MetaMask and proceed creating a wallet. Set a strong password and agree to the terms.
Secure the seed phrase: MetaMask generates a 12-word seed phrase for backup and recovery.
Secure the seed phrase: Write the phrase down and store it securely offline. Avoid saving it digitally to reduce hacking risks. Never share the seed phrase with anyone.
Complete the setup by verifying the seed phrase in the correct order.
Alternatively, users can import an existing wallet. They will need to enter the seed phrase and create a password.
Verify functionality: Ensure the extension or app is installed correctly and the wallet dashboard is accessible.
Installing MetaMask | Source: MetaMask.
Step 2: Connecting MetaMask to the Appropriate Network
Open MetaMask and log in. Then follow the next steps:
Click the network dropdown menu located at the top of the wallet interface.
Click on the network name.
Select the appropriate network: From the dropdown menu, select the network associated with the USDt tokens. Options include Ethereum, BNB Chain, Polygon, or other compatible networks. Add it.
Remember that if the desired network is not listed, users can click “Add Network” and provide the required information:
RPC URL: The URL for the network’s Remote Procedure Call.
Chain ID: A unique identifier for the network.
Currency ticker: The token symbol used on the network (e.g., BNB, POL).
Block Explorer URL: The web address of a tool that lets users view blockchain data for a specific network. It provides detailed information about transactions, wallet balances, smart contracts, and blocks. For example:
Verify the network connection. Ensure the selected network appears at the top of MetaMask.
Confirm information: Check wallet balances and ensure network-specific details are accurate for the chosen network.
Added networks to MetaMask
Step 3: Adding USDt as a Custom Token
If USDt is not automatically detected in MetaMask, users can add it manually by following these steps:
Launch the MetaMask extension or app.
Go to your chosen network.
Click on “Tokens” and then click on “Import Tokens”.
Enter the token contract address.
Enter USDt
Click “Next”.
Remember to verify the contract address. Ensuring that the address is sourced from an official or reliable source is essential.
Step 4: Transferring USDt to Your MetaMask Wallet
The first step is to make sure you have your correct MetaMask wallet address. Then you can do the following:
Open MetaMask: Select the correct network and copy the wallet address displayed at the top.
Send USDt:
Log in to the exchange or wallet holding USDt.
Navigate to the “Withdraw”, “Swap” or “Send” section.
Paste the MetaMask wallet address, choose the matching network, and enter the transfer amount.
Confirm the transaction and send the amount.
Verify the Transfer: It is a good idea to use a small test transaction first and verify the recipient address and network compatibility before sending.
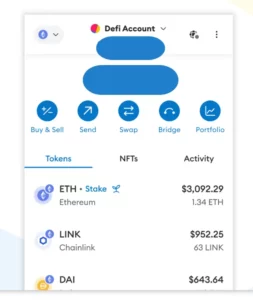
Managing Your USDt in MetaMask
Managing USDt in MetaMask is straightforward. To view USDt balances and transaction history, users should open MetaMask and select USDt to see the details.
If switching between networks, individuals must click the network name at the top of the MetaMask screen and choose the correct one.
Troubleshooting Common Issues
Managing tokens in MetaMask can sometimes come with challenges.
Tokens are not showing up: Users should manually add the token to the wallet by selecting “Import Tokens” and searching for the correct contract address.
Incorrect network connections: Individuals must double-check that the selected network matches the one where the tokens are held.
Failed transactions: Users should confirm enough funds to cover gas fees and verify that all transaction details are correct.
Tips for Safeguarding Your USDt on MetaMask
To keep USDt secure on MetaMask, users should follow these best practices:
Protect your seed phrase: Never share the seed phrase with anyone, including MetaMask support.
Beware of phishing attacks: Be cautious of suspicious emails, messages, or websites.
Use a strong password: Create a complex password for the MetaMask account.
Enable two-factor authentication (2FA): It is always a good idea to add 2FA, an extra layer of security to the account.
Use a hardware wallet: A hardware wallet like Ledger Nano S or Trezor can add security.
Avoid public Wi-Fi: Public Wi-Fi networks can be vulnerable to attacks. Use a secure private network whenever possible.
Keep MetaMask updated: Regularly update the MetaMask extension or app to the latest version.
Be mindful of smart contract interactions: Only interact with verified and trusted smart contracts.
Conclusion
To safeguard USDt on MetaMask, users must take essential precautions. Protecting the seed phrase, staying vigilant against phishing attacks, and using strong, complex passwords are key steps to secure a wallet.
Enabling 2FA and using a hardware wallet provide extra layers of safety. Avoiding public Wi-Fi networks, keeping MetaMask updated, and only interacting with verified smart contracts help minimize risks. By applying these best practices, users can enhance their wallet security and reduce the chances of losing their assets.
FAQs
Can users add USDt to different MetaMask networks?
Yes, users can add USDt on different networks, such as Ethereum, BNB Chain, or Polygon, to MetaMask. They must select the correct network within MetaMask and add the appropriate contract address for USDt on that specific network.
What is the contract address for USDt?
The contract address for USDt varies depending on the network. Users can find the correct contract address on trusted sources like CoinGecko, CoinMarketCap or directly from the USDt issuing company, Tether. Always verify the contract address before adding it to MetaMask.
Why is USDt not showing up in MetaMask?
If USDt is not showing up, users may need to manually add it by selecting “Import Tokens” in MetaMask. Ensure that the network is correct and enter the USDt contract address. Tokens might also be missing if the wrong network is selected.
Is MetaMask safe for storing USDt?
MetaMask is generally safe for storing USDt if users follow security best practices. These include securing the seed phrase, using strong passwords, enabling 2FA, and considering a hardware wallet for added protection.
Dr. Lorena Nessi is an award-winning journalist and media technology expert with 15 years of experience in digital culture and communication. Based in Oxfordshire, UK, she combines academic insight with hands-on media practice.
She holds a PhD in Communication, Sociology, and Digital Cultures, and an MA in Globalization, Identity, and Technology.
Lorena has taught at Fairleigh Dickinson University, Nottingham Trent University, and the University of Oxford. She is a former producer for the BBC in London, with additional experience creating television content in Mexico and Japan.
Her research focuses on digital cultures, social media, technology, capitalism, and the societal impact of blockchain innovation.
She has written extensively on digital media and emerging technologies, with her work featured in both academic and media platforms. Her Web3 expertise explores how blockchain technologies shape culture, economics, and decentralized systems.
Outside of work, Lorena enjoys reading science fiction, playing strategic board games, traveling, and chasing adventures that get her heart racing. A perfect day ends with a relaxing spa and a good family meal.


 Easy
Easy