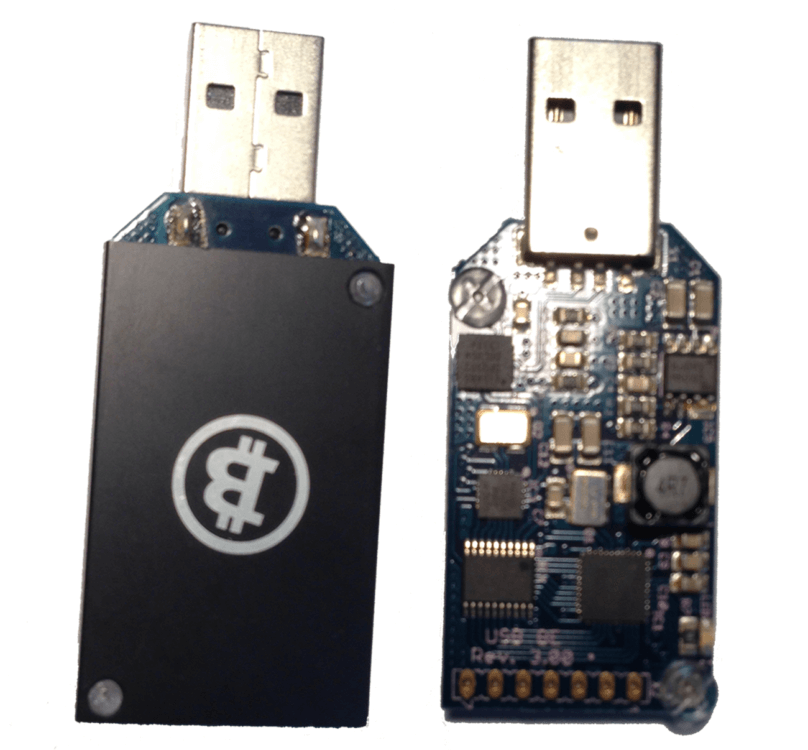
The top (left) and bottom (right) of the Block Erupter USB.
Bitcoin mining has evolved rapidly over the past few years. From CPUs, to GPUs, to FPGAs, to ASICs, the most up-to-date and powerful miners change constantly. When the first ASIC miners were shipped to customers in early 2013, miners became incredibly more powerful than before. Among the first ASIC miners announced was the Block Erupter USB: a small USB (Universal Serial Bus) that mines for Bitcoins.
A History
Block Erupter USBs were first announced by friedcat on May 4th, 2013, on BitcoinTalk.org. They were small, portable, yet relatively powerful miners, and were suggested as “a perfect gift for getting people knowing about Bitcoin and Bitcoin mining.” The colors included blue, silver, black, red, and yellow. The minimum order amount was 300 USBs, so retailers and group-buys were the main way to obtain one. For group-buys, one person would buy the bulk order and sell a few USBs individually to different buyers. Today, Block Erupters can be bought solo or in bulk. The average price you’ll find for one is $4.00, usually from Amazon or eBay, although eBay tends to be less expensive.
The USB in scale to a banana!
Relevance
When the USBs were first announced, the Bitcoin mining difficulty was about 9,000,000. It is currently 40,000,000,000, so the difficulty has increased a whopping 444,344% since then. If you’re looking to make a profit, Block Erupter USBs shouldn’t be your first choice. With no difficulty changes, you’ll lose $0.13 a month. However, don’t count out the Block Erupter as a miner. It’s great for hobbyists and beginners to Bitcoin mining– it provides an experience of taking care of and analyzing the miner, which is a great start for those who are looking to use more advanced miners.
If you’re only going to lose $0.13 a month using a Block Erupter, I think it’s a good miner to buy as a hobby and learning experience. It allows you to experiment creating a rig, using safety precautions, and analyzing your earnings. These are all things you’ll do when buying more powerful miners, and the Block Erupter is similar in these regards.
My first miners ever were Block Erupters; I bought 10 on eBay for $30.99 ($3.10/each) from a seller. The seller was very nice, and answered questions that I sent to him about the USBs over private message. I received the miners shortly after, and excitedly unboxed them. All 10 arrived in a small white box which were packaged inside of a larger box; each miner also came with a clear plastic casing. The Shipping Gods were kind, as each miner came in perfect condition. I plugged a USB into my laptop’s USB port and quickly learned that the miners get very hot very quickly. Within a few minutes, touching the USB while it’s been running will burn you. You probably won’t get a scar or any serious injury, but it hurts enough to sting for a minute or two. For this reason, I suggest buying a fan to run over your miners to keep them cool. I personally use an ARCTIC Breeze USB fan; it does a good job of keeping the fans cool. I put it straight in one of the USB ports on the USB hub (more about this a few paragraphs below) and point it over the USBs.
Tip: You may have heard that mining on a laptop is a bad idea and can destroy your laptop; this is true. However, you aren’t mining on your laptop when using a Block Erupter USB. You’re mining on the USB–– the laptop is merely what it connects to in order to log its hashes. Make sure you’ve turned off CPU and/or GPU mining on your mining program.
I had slight difficulties with understanding some of the miner’s hashrates, but I later realized that it was because I was plugging two miners into my laptop at once (it has two different USB ports) and I was getting confused by which one’s hashrate I was reading on the computer. I ended up plugging them in individually one at a time, and each one reached the expected 333 MH/s +/- 10%.
Before buying the miners, I knew that I would only be able to run two at a time because my laptop has two USB ports, and that wouldn’t be optimal: I would have eight laying around doing nothing! The solution to this is buying a USB hub: a device that allows you to plug multiple USBs into it at one time. After about an hour of research, I decided on the Rosewill RHB-500 10-Port USB 2.0 Hub. I decided to buy one from Newegg, with Bitcoin of course! It cost $24.99 at the time with free shipping. I bought it at 1:30 PM one day and picked seven-day shipping, and it arrived the next day!
When choosing my USB hub, a resource that I followed closely was a post entitled “Which USB hub to use with Block Erupters” BitcoinTalk. While the entire guide helped me make my decision, here’s an excerpt from it that was very helpful to me to check how many Block Erupter USBs a hub could handle:
A good point of reference made by finlof: You need to have 2.5VA per device. So for example if the adapter says 5V 3A then you can power 15VA worth of devices which = 15/2.5 = 6. You really have to be careful with the USB hubs cause you could potentially mess up a device or computer if overloaded. Note further that, to be on the safe side, you should connect one less BE than what the theoretical max limit calculation above will give you, or run the risk if prematurely burning out the AC adapter.
The hub that I use is theoretically capable of supporting 8 Block Erupter USBs, although there are 10 ports. I’ve used a maximum of 7, other than for testing, during which I tried using 8 for a few minutes. Currently, I can only possibly use 7, as I’ve given away a couple USBs, and only have 7 left.
I plug all of the miners in to the hub, plug the fan in to the end of the hub and run it over the miners, and plug the hub’s USB in to the USB port on my laptop. The next step is to open up the program you use on your computer to mine. I tried using MacMiner and Asteroid, but I was having troubles with both. I ended up using the command-line BFGMiner. It works! I can now see the hashrate from all seven miners. Note that the miners are numbered 0-6, not 1-7. My current project is connecting the USB hub to a Raspberry Pi, a small computer. This will allow me to keep the miners running without leaving my laptop open. It will also allow me keep the miners stationary, as they will no longer need to move around with my laptop. Currently, if I want to mine I need to either stay at my desk where the miners are running or carry the miners around with my laptop, which is bothersome. The Raspberry Pi will fix this problem.
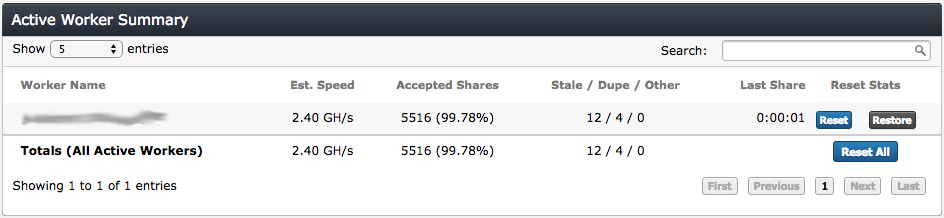
A screenshot of my BTC Guild dashboard. Est. Speed is my hashrate.
I used BTC Guild for my pool with the USBs. I averaged 2.40 GH/s, or ~0.343 MH/s per USB, a bit above the projected 333 MH/s! BFGMiner gave me live statistics on how my miners were doing. I see their hashrate and accepted shares, as well as a lot of other important information. I can also manage my miners from BFGMiner; for example, I have the ability to disable one.
All in all, Block Erupter USBs are a good resource for beginners and people looking to get in to mining. They’re relatively inexpensive and a good way for beginners to learn about mining and taking care of a rig. However, if you’re looking for a profit, Block Erupter USBs aren’t for you– you’ll probably lose a few cents each month due to the electricity costs of running one. They also make for a nice gift or conversation starter.
Good luck with your Block Erupter USB! If you have any questions, feel free to comment below or email me at [email protected].
All photos taken by the author, Jonathan Saewitz, for this guide. Screenshots are from their respective applications. Neither Jonathan Saewitz nor CCN.com are responsible for anything that may happen as a result of this guide, including, but not limited to, losing digital currency. Note that mining is risky, as it’s possible to lose money. Miners can also start a fire or cause injury, especially if not used properly. Be careful and follow safety precautions when using a miner to reduce the risk of an accident.
What do you think of the Block Erupter USB Miner? Comment below!
I am a teenager in high school who is very interested in digital currencies. I enjoy researching Bitcoin and other digital currencies, but my favorite crypto is Dogecoin. Please feel free to email me at [email protected].